Printing - Sharp Printer Overview
How to Find and Add a Printer
- Look on your computer's desktop for an icon labeled "Find Printers"
- Double click the "Find Printers" icon
- Click on the "Location" column header to sort the list by location name
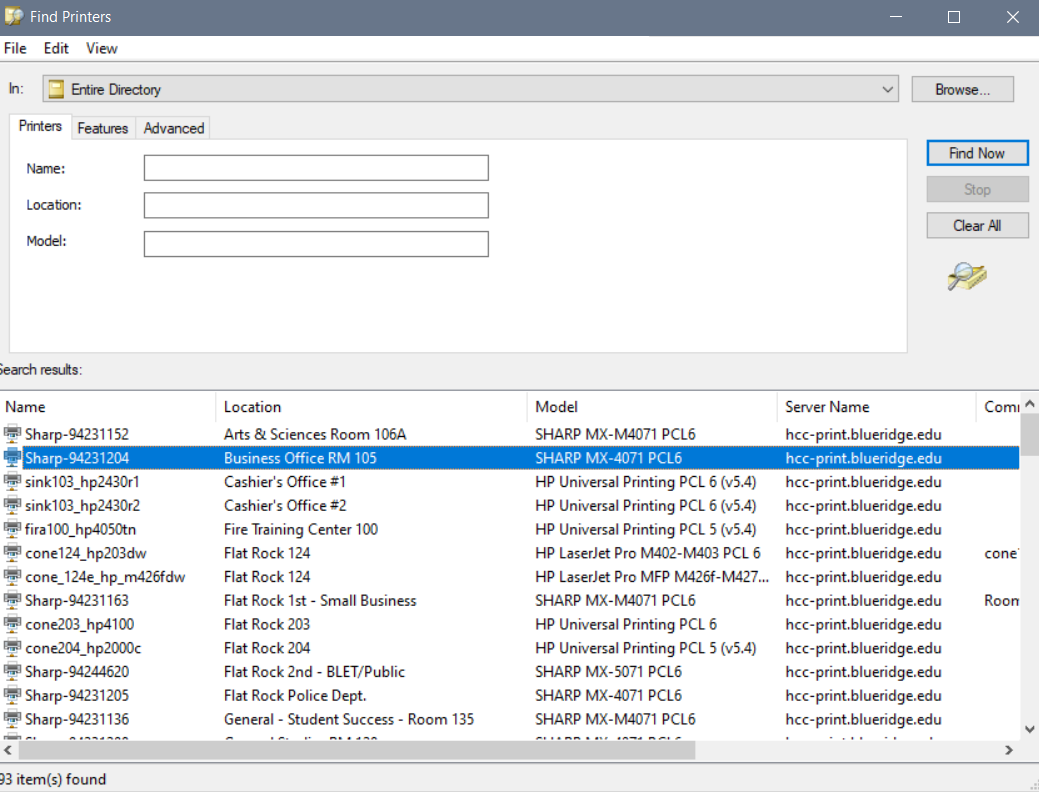
- Once you have located the printer you wish to add, simply double-click on that row in the list.
- The printer should automatically install itself onto your computer. The process might take a couple of minutes to complete.
To Print to Any Printer
Print to Global-Print-Release-BW or Global-Print-Release-Color and walk to any Sharp printer to retrieve your document by logging in and pressing "print release."
- Either press select all jobs or choose the job you want to print. (The print jobs will be held for 1 hours)
- Press the log out button with your name in the upper right-hand corner or press the home button on the upper left-hand corner to continue to scan or copy using the Access Device button
- If you sent your job as color accidentally you can check the box grayscale
- If you forgot to change to double-sided you may check that box as well
- You may also press the delete button as well if you decide not to print
How to Place a Service Request
To place a service call please contact Teresa Goldsmith in the Print Shop at extension 1727
Toner and waste toner receptacles are automatically ordered for you.
Two Ways to Login
- Swipe your badge
- Initial login (This is only done once)
- Swipe your card where indicated
- It will tell you are not registered
- Enter your credentials (username and password) that you use at your computer
- You can use the provided keyboard on the screen or the pull out keyboard depending on the MFP.
- Press log in
- Press ok or set
- After initial login
- Walk up and swipe your card where indicated
- Login with network credentials (same username and password as you use for email)
How to Operate the Printer
To Copy
- Login to device with card swipe or username and password
- Press Access Device
- Press Copy
- Put originals in the feeder face up or on glass face down on the glass on the left-hand side
- Press B/W or Color start button
Note:
CA - Clears everything back to defaults
C - (Near Keypad) Clears quantity only
To Choose Paper Drawers
- The copier will automatically choose the paper for you
- If you want to choose another drawer either touch the copier in the center of the screen and choose the drawer or press paper select and choose your drawer
Two-Sided Copying
- Press 2-sided copy
- The first set of numbers is what you are starting off with, either one sided or two sided. The second set of numbers is what you want your copy coming out, either one sided or two sided.
- Press the ok button to accept
Copy Ratio (to Reduce or Enlarge)
- Press copy ratio
- Choose a preset key or use the+ or - to adjust in between.
- Or press the white box where it says 100% and use the keypad to enter your ratio and press ok.
To Lighten or Darken
- Press exposure
- Press lighter or darker using the half moons
- If copying a mixture of text and photo, use text/photo
- If copying a picture, use photo
To Sort/Group
- The copier will automatically sort and offset from the factory. Therefore you do not have to do anything.
- If you do not want to offset, press others or if on front screen press sort/group and uncheck the offset.
- If you do not want to sort, press sort/group and press group
- Choose group if you want all of page one together and all of page two together
To Staple (if printer has staple feature)
- Press Staple/sort
- Choose the position where you want your staple (1 staple, 2 staples) If applicable stapleless staple
- 1 and 2 staples will staple up to 50 pages, stapleless staple is up to 5 pages
- Press ok to accept
To 3 Hole Punch (if printer has 3 hole punch feature)
- Press Others
- Press Punch
- Press On
- Press ok
To 2 Hole Punch At Top of Page (if printer has 2 hole punch feature)
- Press Others
- Press Punch
- Press On
- Place your original in landscape in the feeder and you must have 8 ½ x 11 R paper in one of your drawers
- Press ok
Previewing Documents Prior to Copying or Faxing
- Login in and Press Access Device
- Press copy
- Instead of pressing start you can press preview (which is located above the start buttons in each of the functions)
- This allows you to look at your document prior to copying or faxing
- If you want to make changes such as reduction/enlargement, paper trays or exposure press the arrow on the far left of the screen and make your changes.
- Once you have made all your changes or if no change was needed press start
- If you want to edit your document such as redaction, delete pages, rotate pages or move pages press the picture with the pen (located on the left on the bottom of the screen).
- Touch your page you want to edit and choose the option on the ride side of your screen.
- If you are going to delete an area on the page (redaction) press Erase Specified Range Erase Specified Original Area.
- Scroll to the page you want to redact. You have up to 4 areas you can delete per page.
- You may use the + button to increase the size of your document to see it better on the screen
- Press a spot on your document and press This is start point.
- Press another spot on the document to create a box and press This is end point
- At this time you may adjust the size of the box with the arrows to the area you want to delete.
- Once you are happy with your deletion press execute.
- If you have another place you want to delete repeat process by pressing specify range 2.
- Once you are done press exit then edit end and you will see your document with the deletions you have made and press start
How to Scan to Your Email
- Log in
- Press Scan
- Press start if your originals are one sided, letter, 300dpi, PDF and you want the copier to scan color or black and white just like your original
- If you want to make changes press Settings and make your selections
- If you would like to change the default file name press the white box to the right of file name. Use the keyboard on the screen or use the pullout keyboard.
To Fax (if printer has fax feature)
- Log in
- Press Access Device
- Press Fax
- Enter your fax number using the keypad on the screen and press start
- If you have a programmed number press address book in upper left-hand corner and choose your destination.
- To send a 2-sided original press original and choose two-sided booklet and press OK.
- To send to multiple people, Enter your fax number and press the + sign to the right of your number. Dial your next number and press+. (You will see how many numbers you are sending to.) Press address review to see all your numbers if desired. Press OK and start
- Press resolution if you would like to send with better quality. Choose half tone if you are sending a picture or grey scale.
To Program a Fax Number at the Copier (if Printer has fax feature)
- Press Fax
- Press address book
- Press add new
- Press the white box to the right of name. Using the pull-out keyboard or the one provided on the screen enter the name of the fax recipient.
- Press enter on the keyboard or ok on the screen
- Press the white box next to address (required) and enter the fax number and press enter using the pull-out keyboard or ok on the screen.
- Press Register
Print a Document with Features Under Printer Properties
Under the Main Tab
- Original Size - Click on the drop-down box and choose what size is your original is.
- Output Size - Either leave as same as original size or click on the drop-down box and choose another size.
- Orientation - Portrait or landscape (probably already done in page setup)
- Zoom - Check the box and click on settings and enter a copy ratio.
- 2-Sided Printing - You can choose long edge, which reads head to head or you can choose short edge, which reads head to toe
- N-Up Printing - This will put 2 pages on one at a 64% reduction or 4 pages at a 50% reduction. You can go up to 16 pages on one sheet. You may also repeat a page up to 16 on a one page.
- Color Mode - Depending on which print driver you choose Color or Black and White
Under Paper Source Tab
- Paper Tray - This tells the print driver what drawer you would like your document to come out of or you can choose a drawer by clicking on the specific drawer on the picture of the copier.
- Paper Type - This is where you can choose the special paper you are using such as envelopes, labels or heavy stock. Make sure the copier also says the same paper that you designate at the PC is at the copier. They must match in order for the job to print.
Under Finishing Tab
- Staple (If Applicable) - Choose either 1 staple, 2 staples, staple less (up to 5 pages) or choose saddle stitching
- Punching (If Applicable) - Drop down and choose 3 holes for your standard 3-hole punch. Make sure left is chose for the position. If you want 2-hole punch your position must be top. You must also have Letter-R paper loaded in your machine for 2-hole punch.
- Fold (If Applicable) - Click on the drop down and choose half fold. You must have letter R paper loaded in your machine.
- Offset - Keep offset each set if you want a distinction between sets otherwise click on none.
Under Layout Tab
- 2-sided printing - You can choose long edge, which reads head to head or you can choose short edge, which reads head to toe
- Booklet - Choose standard to create a pamphlet/booklet.
- N-Up - Click on this if you are reducing full size sheets onto one page. This feature is also found on the main screen with more of a description.
Under the Stamp Tab
(You must use the arrow to the right of document filing to get to this tab)
- Click on watermark. Then click on watermark and click on settings and either choose a preset watermark or create your own. You may also choose image file and import a jpeg or bitmap stamp.
Under Image Quality Tab
(You must use the arrow to the right of document filing to get to this tab)
- Choose type of document you are printing such as graphics, photo, CAD, or custom.
- You can choose color in this screen and do some adjustments.