How to Login to Colleague UI5
IMPORTANT: Colleague access is restricted to employee computers on campus. You will not be able to access from off campus.
Blue Ridge CC has three Colleague environments
- Production
- Test
- Development
Please be sure you log into the correct Colleague environment. To help identify the different environments, each is configured with a different color, as seen below.
| Production (blue) | Test (Pink/purple) | Development (Green) |
|---|---|---|
Access by clicking the Colleague shortcut on your desktop or by typing the following address in a browser url bar - https://ui.blueridge.edu |
Access by typing the following address in a browser url bar - https://ui-test.blueridge.edu |
Access by typing the following address in a browser url bar - https://ui-dev.blueridge.edu |
- Enter your AD Username and Password (same as email), then click the "Log In" button. NOTE: Do NOT allow the browser to save your password. Text in the password box can be seen by clicking the "eye" icon at the right of the password box.
- A disclosure statement should appear every time you log in to Colleague UI
- Click "OK" to dismiss.
Initial Screen After Login
Navigation Items and Descriptions
- The People Search button, located beside the Form Search button. When this button is lighter, it means that this is the active search option.
- The Form Search button, located beside the People Search button. When this button is lighter, it means that this is the active search option.
- The Search button executes a search for whatever is in the Text Box.
- Provides a list of recently used mnemonics/forms.
- The Navigate button is where the end user can see what access they have for each Colleague application.
- This is the Card. Also called the Context Area or Name Card Area. It contains the basic demographic information on the specific person, vendor, institution, etc. that is selected.
- The Logout button is just that and should always be used when the end user is finished using Colleague – NEVER exit Colleague UI using the browser or tab close button.
- The “X” button is to close the current Card record(s) that is open.
- The Star in gray area to the right of the Card is where an end user can “favorite” a person(s) from the Card area.
- The Star in the light gray area located below the Card is where an end user can “favorite” an open form/mnemonic/screen.
- The Save, Save All, Cancel, and Cancel All buttons are used at the form level. The Save buttons should be used when entering data to make new entries or updating entries. The Cancel buttons should be used when no changes have been made to a form.
- The Piece of Paper button located on the form is the new icon/button for drilling down to a subform/screen. This is also known as detailing down.
- The Window Scroll Controller appears when a field can have multiple values, lines, or pages of data entered, and is somewhat new to UI 5. The end user can move this control bar anywhere on the screen instead only moving it left or right of a line.Moving is accomplished by click-hold-drag on the text portion of the control.
- The Three Dots (ellipsis) on a field indicate to the end user that a LookUp feature exists for that field.
- The Question Mark buttons are both Help features. The question mark in the left navigational/dark gray bar (#9) has process, field, and general help listed, as well, as the Quick Tour Video and a list of keyboard shortcuts for Colleague. The other question mark in the gray area to the left of the Card has Context Area help.
- Open the user’s favorites, both People and Forms.
- The Push Pin button is where the end user can specify to “Keep Context Open” or to “Auto-Close Context.” By default the Context Area/Name Card Area will automatically close all of the records displayed in the Name Card. When the button is shaded with another color (different than the white default), it is in “Keep Context Open” mode.
- The Plus and Minus Scale is the zoom slider bar to increase or decrease the font sizes and fields within the open form/mnemonic/screen.
- The Gear shaped button is where the end user can go to change the Preferences (ie: color schemes, number or results), set field sequencing, etc.
Person Search Results
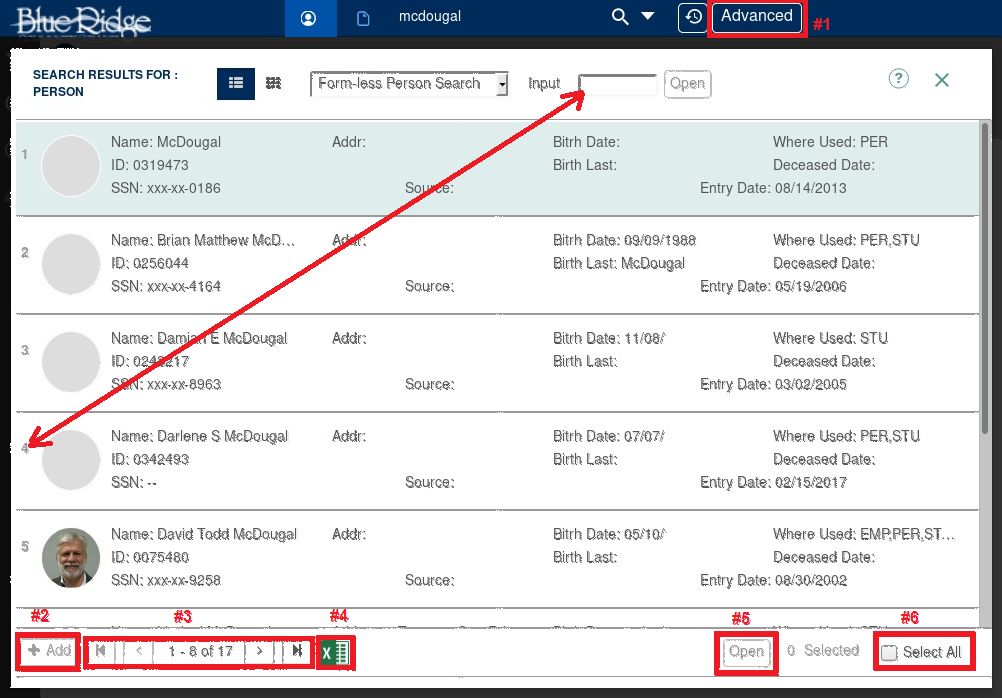
- Open the Advanced Person Search window (see below)
- Add new person
- Results navigation
- Open results in a spreadsheet
- Open selected result
- Select all results
To open a single record, or group of records, enter the result number in the Input box and press enter, or click on the “Open” button. For a group of records, enter result numbers: 2,4-6, 17. Mouse over the “Input” box for more options.
Advanced Person Search
Entries in multiple fields searches for ALL criteria. Ie: a value in “SSN” and a value “Alternate ID” will return results of persons with BOTH values, not EITHER value.
Preferences
Please DO NOT change the primary color of UI. Blue Ridge CC's Colleague environments are purposely color coded, as mentioned above.
If you do not see Person Photos, make sure the ‘Yes’ radio-button under “Display Person Photos” is selected.
Detail/Drill-Down Menu
This is an example of the new popup drill-down menu. If there is a single form referenced, the form will open directly. If one or more forms are referenced, a menu, similar to this one, will open. To open a form listed, double-click it or click it then click “OK.”
Duplicate Record
The “Duplicate record” notice is now yellow. It was red in UI 4. For users with the appropriate permissions, the ‘Duplicate record’ notice can be dismissed to allow access to the card.
Additional Resources
YouTube video showing common UI5 features